DTF troubleshooting is a practical, methodical approach to diagnosing issues in direct-to-film printing, helping shops and hobbyists minimize downtime, reduce waste, and maintain consistent output. In practice, it covers common concerns like printer reliability, ink behavior, film handling, and transfer performance, with a focus on actionable steps you can apply today, such as nozzle checks, color calibration, and controlled curing, addressing DTF ink problems. By framing issues through troubleshooting workflows, you can identify root causes behind color shifts, adhesion gaps, or film wrinkles and apply targeted fixes, consistent with practical DTF printing tips. This approach starts with a pre-check of environment, materials, and equipment, then moves to a repeatable test sequence that builds reliability, minimizes variability, and reduces costly reprints across multiple machines. With a disciplined, repeatable process, you’ll improve uptime, safeguard material costs, and consistently deliver high-quality transfers that meet expectations across fabrics, substrates, and designs in real-world production.
From a broader perspective, DTF-related workflows center on translating artwork from a PET film to textiles through a sequence of printing, powder adhesion, curing, and heat transfer. A practical lens uses alternate terms like direct-to-film process, film-based transfer, and coating-assisted adhesion to discuss the same challenges. Key trouble areas include pigment behavior on the film, nozzle patency, powder flow, humidity effects, and press-time control, all of which can be addressed with a systematic approach. Adopting a repeatable testing routine, consistent materials, and careful parameter tuning helps practitioners predict results and reduce waste, even when switching fabrics or inks. By framing these issues with broader concepts such as color consistency, adhesion reliability, and production throughput, you can apply flexible strategies that scale across equipment and job types.
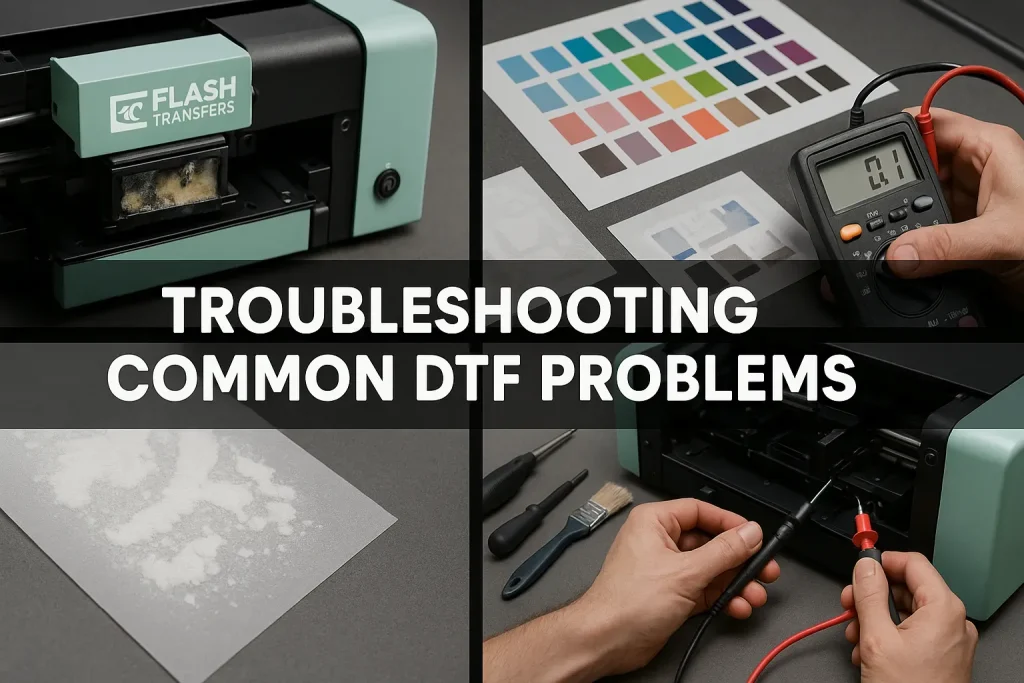
DTF troubleshooting: A Systematic Guide to Resolving Common Issues
DTF troubleshooting is most effective when approached as a repeatable process. Start by validating the core hardware and consumables: run a nozzle check, inspect the print head for clogs, and confirm the printer communicates correctly with the RIP. This early diagnostic step often reveals ink problems before they cascade into film or transfer failures. By treating this as a focused DTF printer troubleshooting exercise, you can quickly identify whether the root cause lies with the machine, the ink, or the media.
With the printer verified, extend the check to the workflow environment and materials. Confirm that you’re using the correct fabric profile, film stock, and adhesive powder, and look for any sign of contamination in the paths that ink travels. Keeping a simple log of settings, ambient conditions, and observed results also aligns with proven DTF printing tips and accelerates root-cause analysis when issues recur.
Diagnosing Print Quality and Color Accuracy Issues
Print quality and color accuracy are often the most visible indicators of a problem. Symptoms such as banding, color bleeding, or washed-out greens point to either ink flow irregularities or misconfigured color management. Address these by performing a nozzle check, cleaning or replacing clogged nozzles, and recalibrating ICC profiles and RIP settings to ensure the output matches the target color space. This approach ties directly into DTF printer troubleshooting and helps isolate whether the problem is ink-related or a profiling mismatch.
To prevent recurrence, soft-proof prints against a calibrated target and run test patches on the same fabric and film combination used for production. Align printer calibration with the chosen ICC profile, check resolution consistency, and verify that color gradients render smoothly. Incorporating these steps into your DTF printing tips routine reduces drift between batches and improves overall color fidelity for a consistent transfer.
Ghosting, Misregistration, and Alignment: Achieving Consistent Registration
Ghosting and misregistration manifest as faint second images or misaligned color channels, eroding transfer quality. The underlying causes often involve calibration drift, misaligned print heads, or improper film loading during feeding. Systematic checks—re-run head alignment, validate channel alignment in the RIP, and confirm the film path is tracking true—are essential components of effective DTF printer troubleshooting. Addressing these issues early prevents subtle errors from compounding in later stages of the workflow.
Use registration aids such as marks on the film and fabric, plus a controlled sample run to verify alignment before large jobs. When multiple color channels are involved, ensure each layer is registered to the others with precise offset correction. This discipline aligns with DTF transfer troubleshooting and helps deliver clean, sharp transfers across the full design.
Powdering and Curing: Ensuring Even Adhesive Powder Distribution
Powdering quality directly impacts adhesion and the durability of the final transfer. Uneven coverage, clumps, or powder that fails to release can stem from shaker misbehavior, humidity, or insufficient curing. Establish consistent powder application patterns, store adhesive powder in a dry, sealed environment, and calibrate the curing interval to the material and temperature profile of the heat source. These steps are core to maintaining reliable DTF printing and reducing post-cure defects.
After curing, allow a brief cooldown to minimize static and ensure the powder is fully set before transfer. If you notice patches or inconsistent release, revisit powder quantity, curing temperature, and exposure time, then document the optimal settings for future runs. Integrating these practices into your DTF printing tips helps maintain stable results across batches and reduces rework due to powder-related issues.
Transfer Performance: Heat, Time, and Fabric Readiness
Transfer performance hinges on selecting appropriate heat, dwell time, and pressure for the fabric you’re printing on. Inadequate heat or excessive dwell time can cause poor adhesion, scorching, or uneven transfers. Follow a structured transfer troubleshooting approach that includes verifying heat press calibration, ensuring uniform pressure, and using a silicone cover sheet to promote even heat distribution. This focus on transfer conditions is essential for consistent results in DTF printing and minimizes post-transfer failures.
Before committing to a full production batch, validate the process on a small sample, adjusting temperature, time, and pressure incrementally until the transfer bonds cleanly and washes withstand expected use. Also check fabric moisture and pretreatment compatibility, since pre-existing moisture or coating can drastically affect adhesion. Document the successful parameters to build a reliable playbook for future projects and leverage practical DTF transfer troubleshooting insights.
Film Quality and Handling: Preventing Wrinkles and Feed Problems
Film quality and handling significantly influence how smoothly the process flows from printing to transfer. Humidity exposure, roll misfeeds, or subpar film stock can introduce wrinkles, curls, and uneven adhesive transfer. Maintain film in a cool, dry environment, and ensure rolls are aligned and free from tangles before loading. Emphasize film quality checks as a standard part of your DTF printer troubleshooting routine to catch issues before they impact production.
Implement a routine of test patterns and short runs to verify film feeding consistency across the press. Regularly inspect splices, edge alignment, and feeder tension to prevent feeds from skewing and to minimize wrinkle formation during the transfer stage. By treating film handling as a dedicated practice—an element of DTF printing tips—you’ll reduce downtime and improve overall transfer reliability.
Frequently Asked Questions
DTF printer troubleshooting: what quick checks should I perform to diagnose print quality issues?
Begin with a nozzle check and a test print to verify ink flow and head health. Recalibrate color profiles in your RIP or printer driver and ensure you’re using a correct ICC profile for the fabric and film. Verify print resolution matches the design and run a controlled test to rule out color shifts caused by profile or media mismatch.
DTF ink problems: what are the common causes of color shifts or banding and how can I fix them?
Common causes include degraded or incompatible ink, clogged nozzles, and incorrect color profiles or RIP settings. Fixes: perform a nozzle check and cleaning cycle, replace or refresh inks as needed, recalibrate color targets, and confirm the ICC/profile matches the fabric and film you’re using. Also verify drying times and ambient humidity to prevent color anomalies.
DTF film issues: how do I identify and fix wrinkles, curls, or feed problems with transfer film?
Film issues are often due to humidity, roll misalignment, or poor film quality. Fixes: store film in a cool, dry place, keep rolls aligned and tensioned, pre-feed a test pattern to check for smooth feeding, and ensure the transfer film is compatible with your powder and heat-press settings.
DTF transfer troubleshooting: what steps optimize adhesion and prevent scorching or incomplete transfer?
Optimize heat press temperature and dwell time for your film and fabric, ensure even pressure across the entire area, and check fabric moisture or pre-treatment compatibility. Run a small test transfer and adjust temperature, time, and pressure incrementally until adhesion is consistent across the design.
DTF printing tips: what routine practices help improve consistency and reduce downtime?
Adopt a repeatable routine: regular nozzle checks and color calibration with targets, maintain controlled environmental conditions, standardize powder application, and keep a log of settings and outcomes to reproduce successful transfers batch after batch.
DTF printer troubleshooting workflow: how can I implement a repeatable process from pre-check to post-transfer?
Use a simple, repeatable workflow: 1) pre-check environment and materials, 2) print quality assessment with nozzle checks and a test print, 3) powdering and curing with even application and complete dryness, 4) transfer with preheating, even pressure, and a controlled dwell time, 5) post-transfer inspection and documentation to refine future jobs.
| Aspect | Key Points | Quick Fixes / Actions |
|---|---|---|
| Print quality and color accuracy issues |
|
|
| Ghosting, double images, or misregistration |
|
|
| Powdering issues |
|
|
| Transfer issues |
|
|
| Film issues |
|
|
| Practical troubleshooting workflow |
|
|
| Maintenance and best practices for long-term reliability |
|
|
| Targeted tips for different parts of the workflow |
|
Summary
DTF troubleshooting is a cornerstone of reliable direct-to-film production, and this overview highlights how systematic checks, calibration, and discipline reduce downtime and improve transfer quality. By understanding common failure modes—print quality issues, ghosting or misregistration, powder and transfer problems, and film-related defects—you can apply targeted fixes that keep production moving smoothly and consistently. Adopting a repeatable workflow, maintaining equipment and materials, and validating results with controlled tests will help you achieve better color accuracy, reliable adhesion, and a steadier production schedule. Whether you’re tackling printer troubleshooting, ink problems, or film and transfer issues, a structured approach will deliver high-quality DTF transfers batch after batch.